Android (Native)
Overview
The Appnomix Commerce SDK is a mobile library that places your brand prominently on users' mobile phones, helping you deepen your relationship with customers.
Version 2.0 adds product detection, price comparison, and a redesigned user interface. Version 1.0 focused primarily on coupon functionality.
On Android, the SDK uses the Accessibility Service (an Android system feature that allows apps to observe and interact with on-screen content) to track browser interactions, such as the currently rendered page. To enable this service, both your application and the SDK must coordinate to ensure the user grants the necessary permission.
Declare android.permission.BIND_ACCESSIBILITY_SERVICE in your app manifest, which requires additional Play Console consent handling before you submit the first version of your app with the Appnomix SDK. See the Privacy & Permissions section for detailed guidance.
At this time, the SDK supports interactions only within Google Chrome. Support for additional browsers can be added upon request.
Key Links
- Appnomix Android Sample App
- For any questions regarding the integration, please contact [email protected]
Getting Started
Minimum Requirements
- Android minSDK version 5.0 (API 21)
- Android compileSDK version 15 (API 35)
- Kotlin 2.0 or higher
Installing the SDK
- Add the SDK dependency inside your current Android Gradle project, linking against the latest version:
repositories {
    mavenCentral() // use mavenCentral as the source of this dependency
}android {
compileOptions {
sourceCompatibility = JavaVersion.VERSION_17
targetCompatibility = JavaVersion.VERSION_17
// backwards support for newer Java APIs the SDK might be using (e.g. SDK using Java_18, while host app using Java_17)
isCoreLibraryDesugaringEnabled = true
}
}
dependencies {
// other project-specific dependencies above/after this
implementation("app.appnomix:sdk:2.1.3")
// backwards support for newer Java APIs the SDK might be using
coreLibraryDesugaring("com.android.tools:desugar_jdk_libs:2.1.4")
}plugins {
id("org.jetbrains.kotlin.plugin.compose") version "your_kotlin_version"
}plugins {
id("org.jetbrains.kotlin.plugin.compose")
}
android {
buildFeatures {
compose = true
}
}- In your app's main Android
Applicationclass, initialize the Appnomix SDK with your credentials:
import android.app.Application
import app.appnomix.sdk.external.AppnomixCSDK

class MyApplication : Application() {

    override fun onCreate() {
        super.onCreate()

        AppnomixCSDK.initialize(
            authToken = "token_received_from_appnomix",
            clientId = "clientId_received_from_appnomix",
            context = this
        )
    }
}
Starting the SDK
Request Accessibility Service access from the user by launching the Onboarding flow. This flow explains the SDK's features and why the permission is required.
import app.appnomix.sdk.external.AppnomixCSDK

class MainActivity : AppCompatActivity() {

  override fun onCreate(savedInstanceState: Bundle?) {
    super.onCreate(savedInstanceState)

    // you can check for unmet requirements, before launching the onboarding, by requesting them from the SDK and checking if the returned list is empty.
    // val unmetRequirements = AppnomixCSDK.unmetRequirements()

    if (AppnomixCSDK.isAccessibilityServiceEnabled) {
      // the permission is already granted, you can proceed with the rest of your app logic
      return
    }

    // Checks whether the **onboarding flow** for the Appnomix SDK is currently available. (e.g. is was previously completed)
    if (AppnomixCSDK.isOnboardingAvailable()) {
        // Launches the onboarding only if it wasn't finished before. If already completed, this call does nothing.
        AppnomixCSDK.showOnboarding(this)
    }
  }
}
If you need more control over the onboarding experience, use these additional functions:
AppnomixCSDK.isAccessibilityServiceEnabled→ returnstrueif the service is enabledAppnomixCSDK.goToAccessibilitySettings→ navigates the user directly to the OS Accessibility Settings, bypassing the onboarding flow.
Customize the onboarding screen colors by passing a JSON string via AppnomixCSDK.showOnboarding(activity, jsonString). See the sample app configuration for an example.
What's next
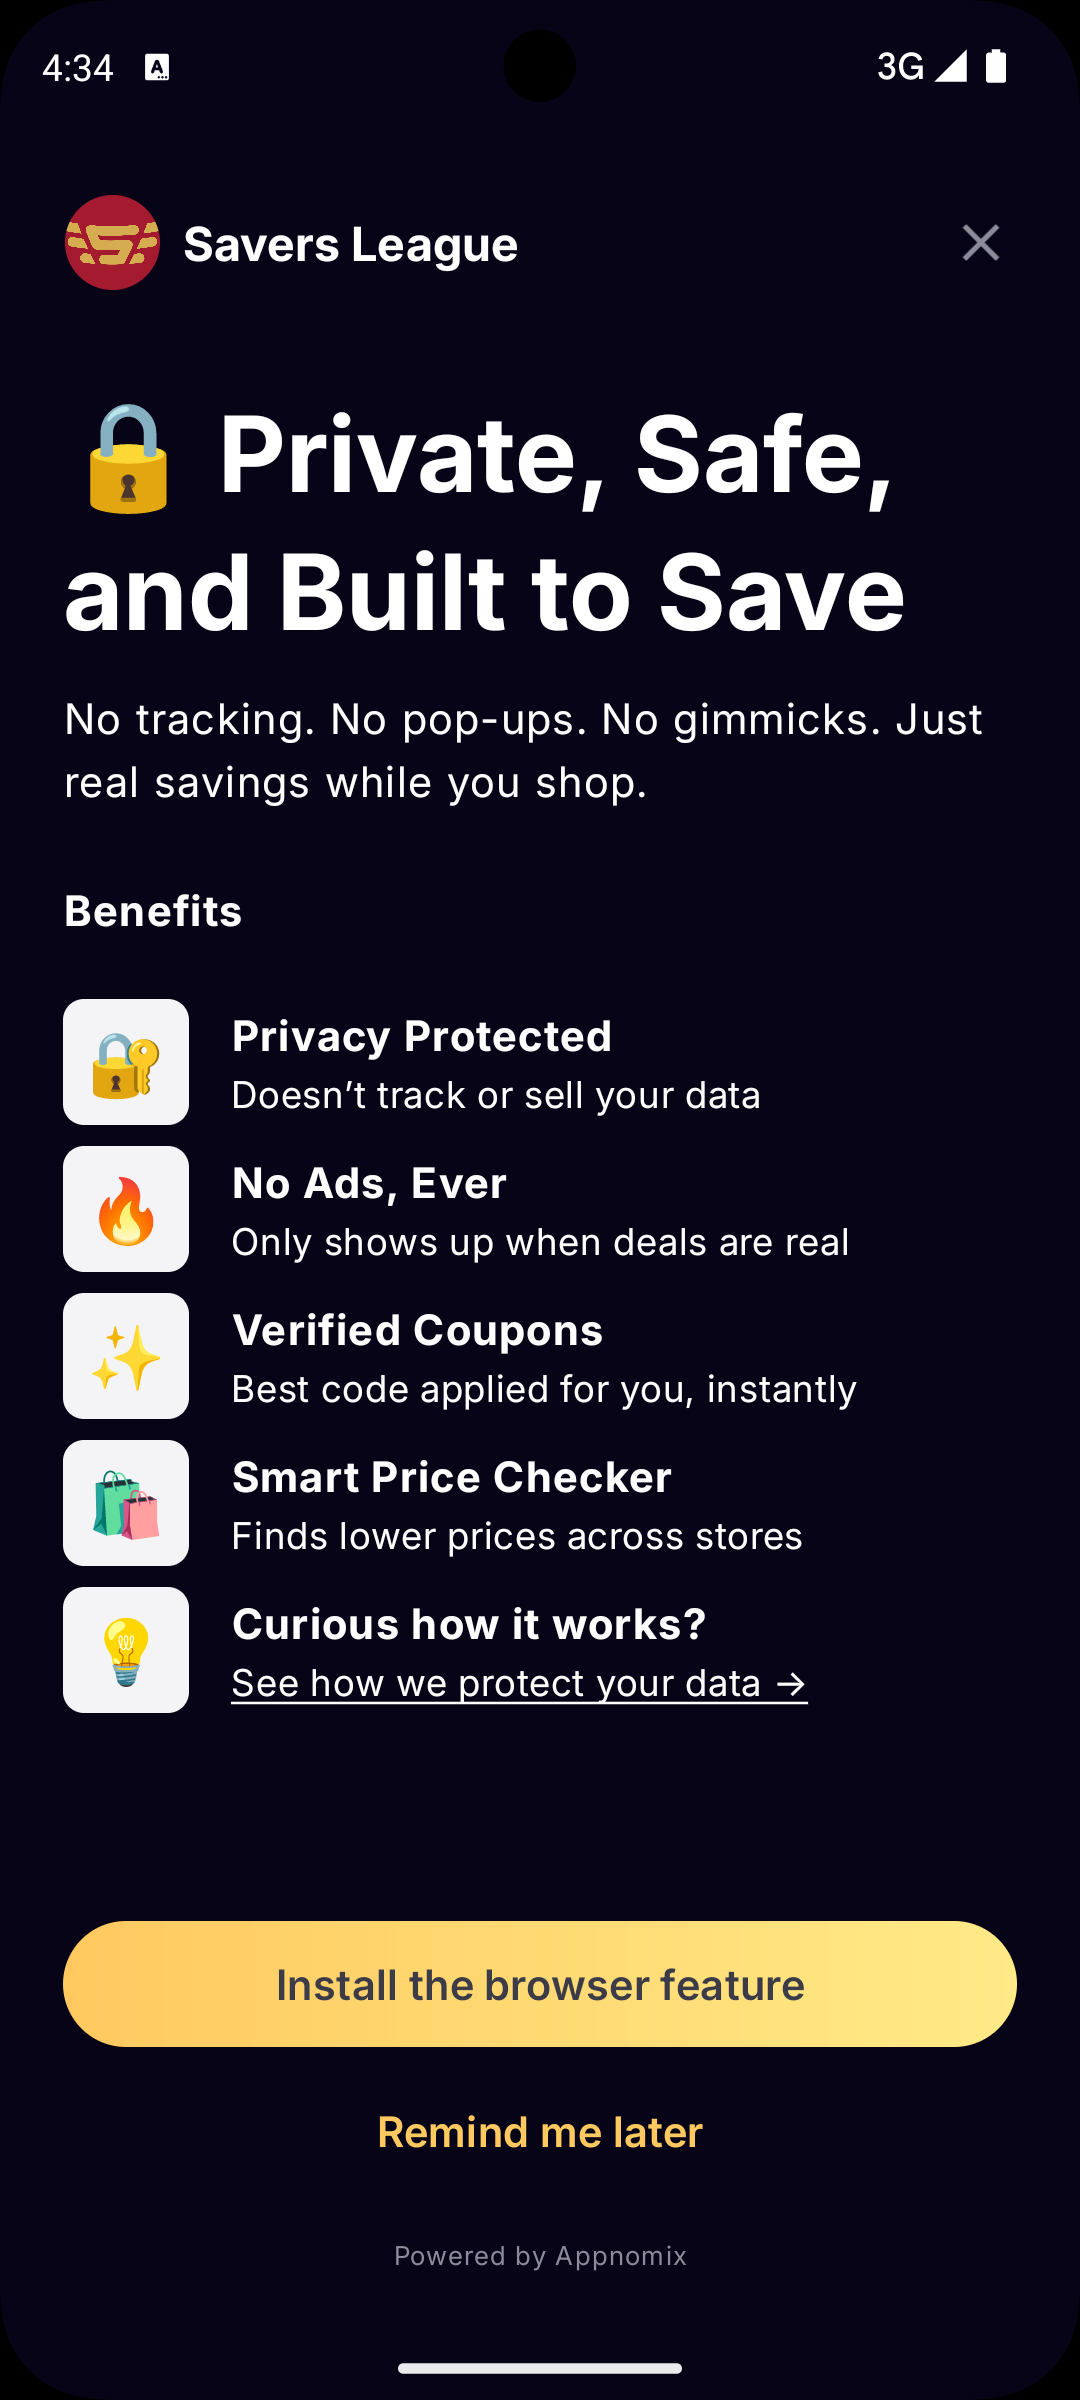
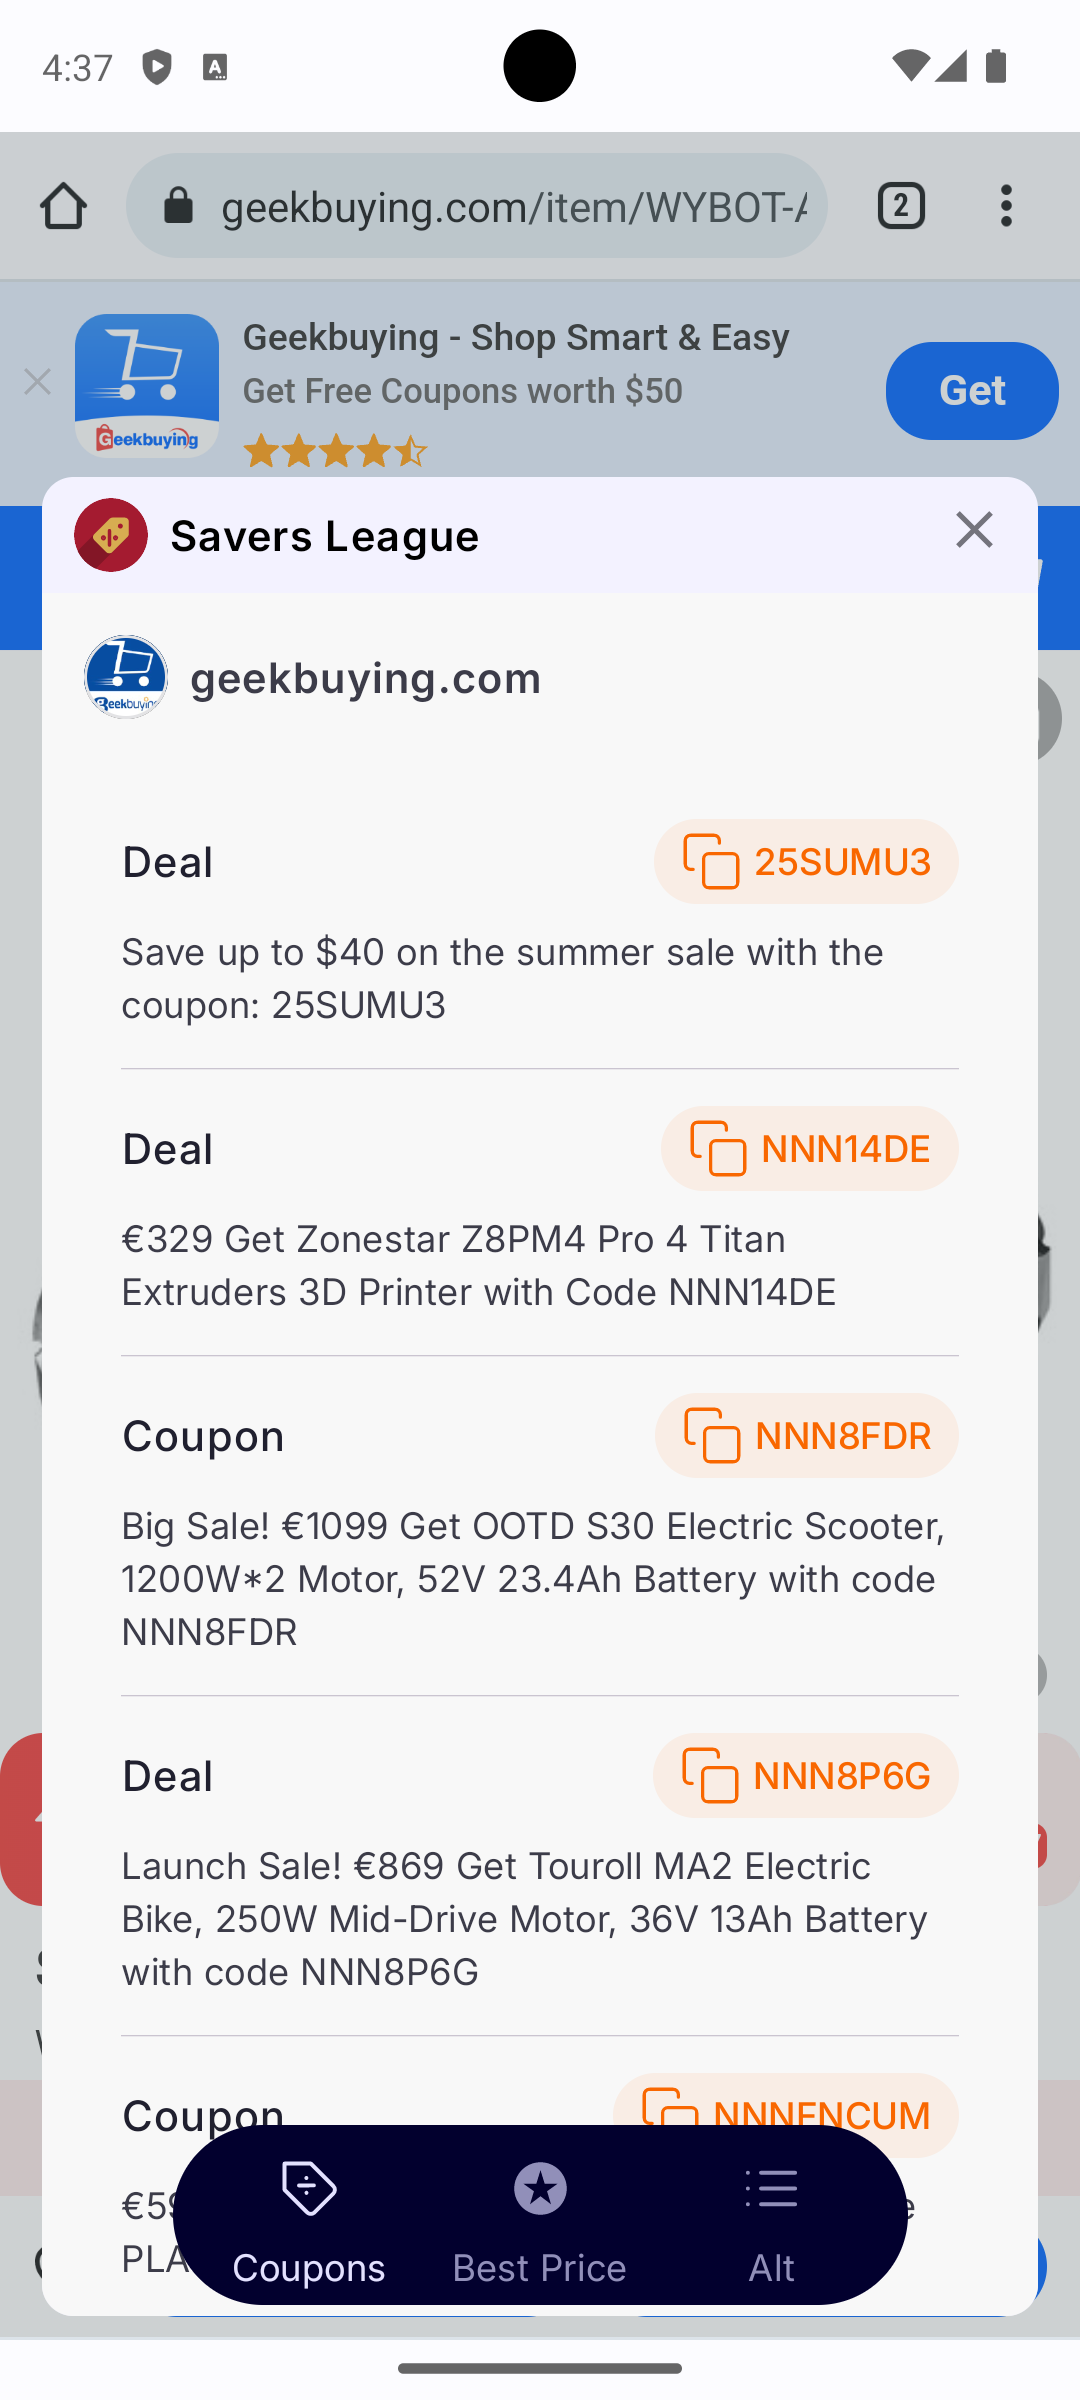
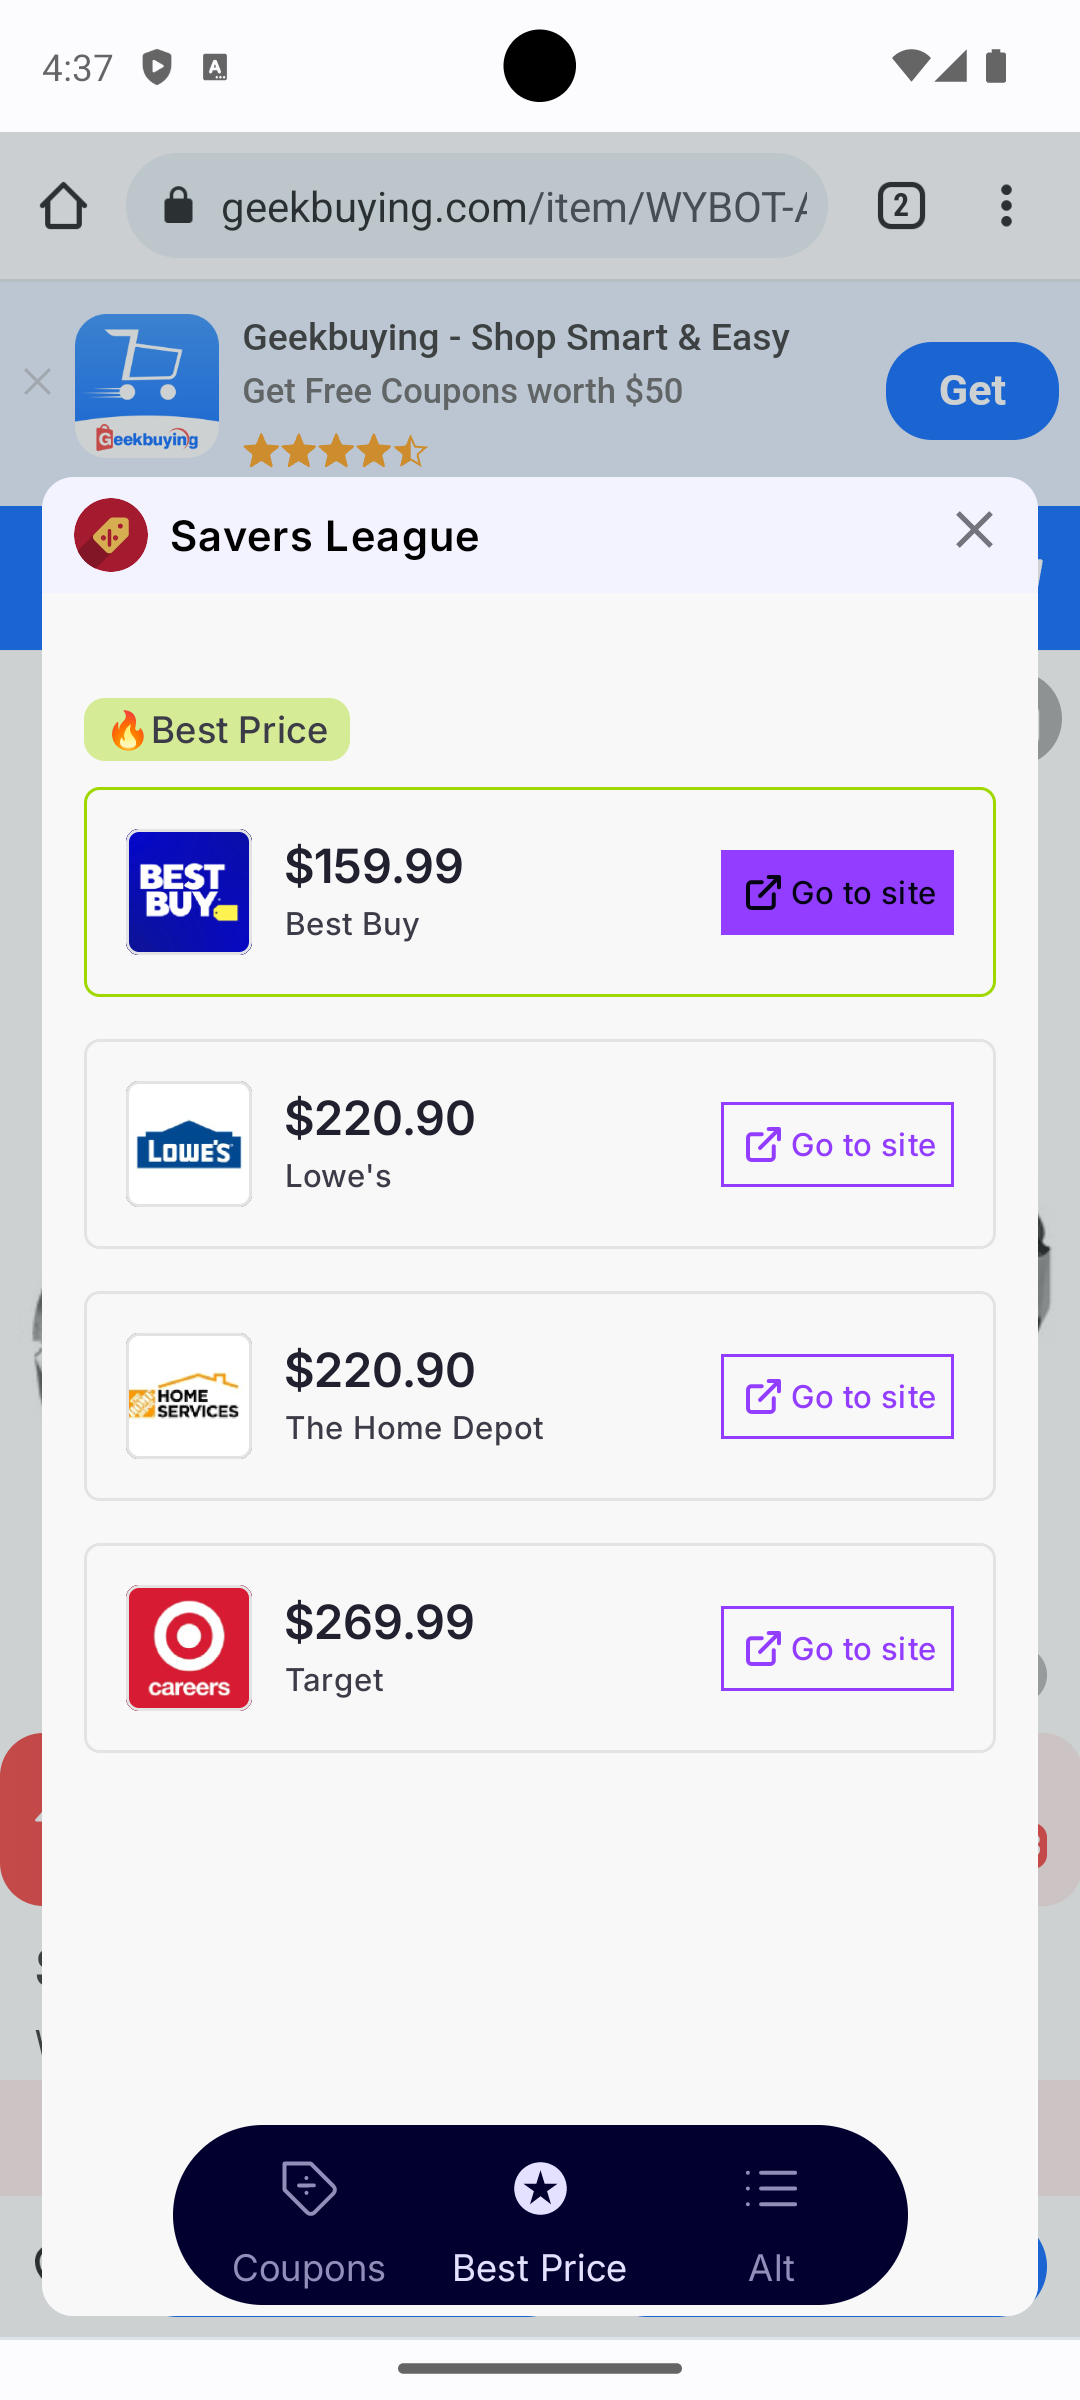
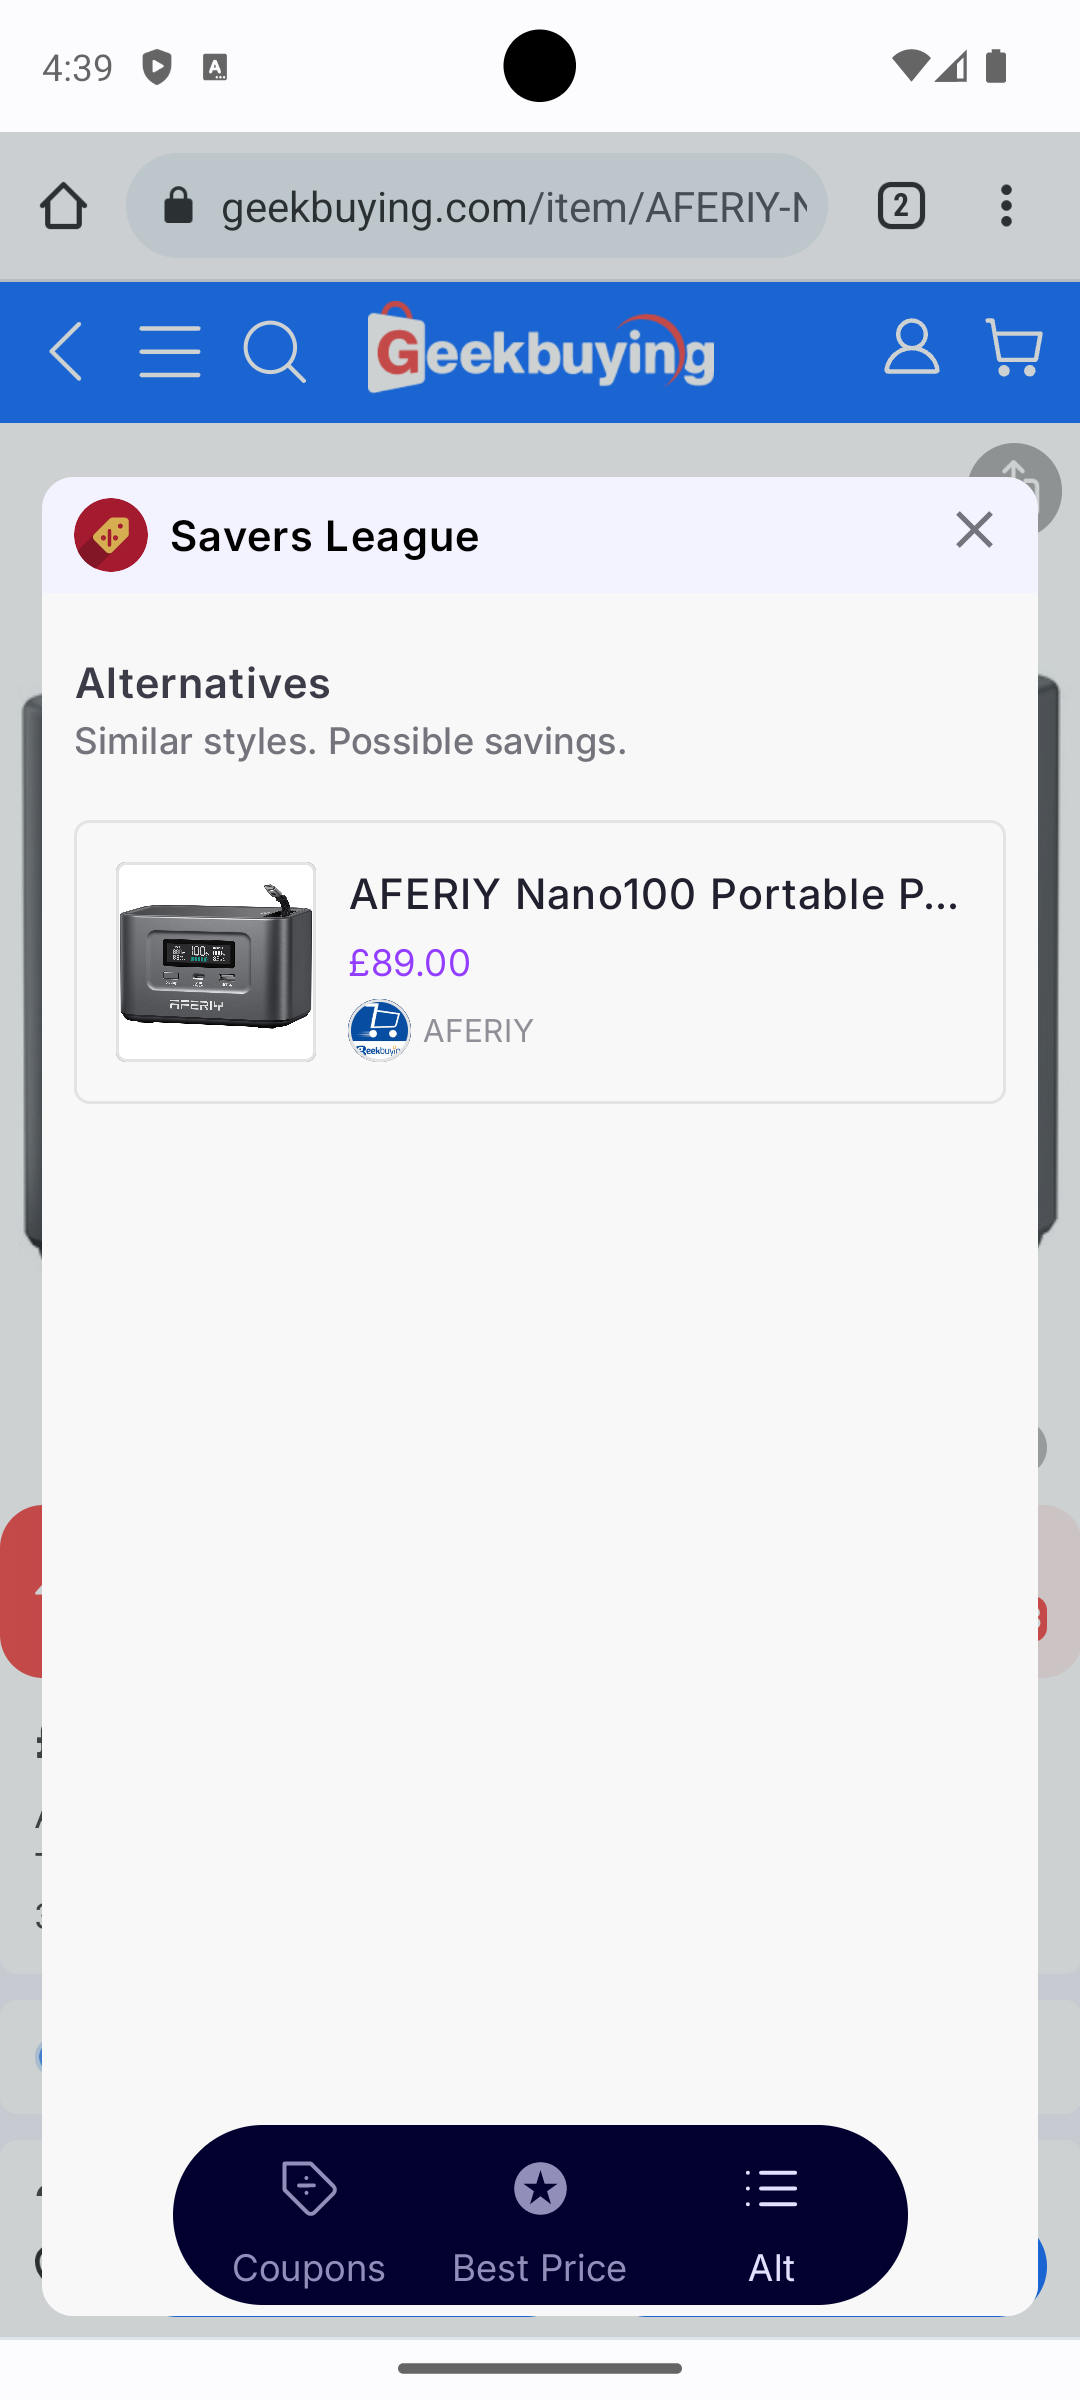
After a successful integration and once the user grants Accessibility Permission, visiting a website in Chrome where the SDK identifies valid deals will display the following elements on screen:
Event Tracking
Event Listeners
If your app requires more granular control over the onboarding process, register an event listener that fires when onboarding is started, finished, or abandoned:
AppnomixCSDK.registerEventListener(object : AppnomixEventListener {
    override fun onAppnomixEvent(event: AppnomixEvent) {
        when (event) {
            AppnomixEvent.ONBOARDING_STARTED -> {
                Log.i("AppnomixSample", "User started Appnomix Onboarding")
            }

            AppnomixEvent.ONBOARDING_ABANDONED -> {
                Log.i(
                    "AppnomixSample",
                    "User left Appnomix Onboarding without activating the extension"
                )
            }

            AppnomixEvent.ONBOARDING_FINISHED -> {
                Log.i(
                    "AppnomixSample",
                    "User left Appnomix Onboarding and the extension is Activated"
                )
            }
        }
    }
})
Tracking Offer Display
When you present the offer to users (e.g., as part of a list that includes Appnomix among other providers), call the following function to ensure accurate funnel tracking (measuring how users progress through each step of engagement). Pass a string representing the context where the offer appeared, such as "home_screen", "special_offers", "level_complete", or "daily_rewards".
AppnomixCSDK.trackOfferDisplay("home_screen")Installation Verification
Detect successful installation by checking AppnomixCSDK.isAccessibilityServiceEnabled, which returns true if the Accessibility Service permission is granted for your app.
if (AppnomixCSDK.isAccessibilityServiceEnabled) {
    // Extension is active
}
Use Cases
These integration patterns show how to position the SDK within your app's existing features.
Reward & Loyalty Programs
Grant users in-app rewards — points, credits, or premium content — for activating the SDK. After the user completes onboarding, check AppnomixCSDK.isAccessibilityServiceEnabled to confirm activation and trigger your reward logic.
AppnomixCSDK.registerEventListener(object : AppnomixEventListener {
    override fun onAppnomixEvent(event: AppnomixEvent) {
        if (event == AppnomixEvent.ONBOARDING_FINISHED) {
            // Grant reward — e.g., add points, unlock content
            rewardManager.grantActivationBonus(userId)
        }
    }
})Reward fulfillment and tracking are your app's responsibility. The SDK handles affiliate link redirection after activation but does not manage reward state.
Daily Engagement & Retention Hooks
Present the SDK activation offer during high-engagement moments — level completions, daily check-ins, or special offer screens. Call trackOfferDisplay with a context string so you can measure which placements drive the most activations.
// Track where the offer was shown for funnel analysis
AppnomixCSDK.trackOfferDisplay("level_complete")

// Then show onboarding if not already activated
if (!AppnomixCSDK.isAccessibilityServiceEnabled && AppnomixCSDK.isOnboardingAvailable()) {
    AppnomixCSDK.showOnboarding(this)
}The SDK does not attribute conversions to specific in-app moments. Implement host-side analytics to correlate
trackOfferDisplayplacements with activation rates.
Cashback & Fintech Apps
Position SDK activation alongside your app's existing money-saving features. The SDK's automatic coupon detection and price comparison (v2.0+) complement cashback and savings tools, letting you surface them under a unified "savings" section in your app.
// Example: show Appnomix as one option in a savings hub
if (!AppnomixCSDK.isAccessibilityServiceEnabled && AppnomixCSDK.isOnboardingAvailable()) {
    AppnomixCSDK.trackOfferDisplay("savings_hub")
    showSavingsCard(
        title = "Auto-apply coupons while you shop",
        onTap = { AppnomixCSDK.showOnboarding(this) }
    )
}The SDK does not process or track financial transactions. Any cashback or savings calculations must be implemented in your app.
Customization
UI Customization
Customize the onboarding flow UI by passing an optional JSON string to the showOnboarding function.
Edit the JSON values directly, or use the Appnomix UI Configurator to adjust the UI visually — it generates the JSON automatically.
Note: The web configurator renders a mocked UI to aid in getting a better sense of how the changes might look on a real device.
Once you've finished editing, pass the JSON as a string parameter to showOnboarding. Store the JSON however suits your app — as a bundled file loaded at runtime, or as a string constant.
If you need to customize onboarding UI elements beyond what the JSON covers, contact [email protected].
Language Selection
The SDK accepts ISO 639-1 language codes (two-letter codes like "en" or "de") through its initialize function. Currently, only "en" and "de" are supported. If you omit the language code, the SDK defaults to "en".
import android.app.Application
import app.appnomix.sdk.external.AppnomixCSDK

class MyApplication : Application() {

    override fun onCreate() {
        super.onCreate()

        AppnomixCSDK.initialize(
            authToken = "token_received_from_appnomix",
            clientId = "clientId_received_from_appnomix",
            options = AppnomixCSDK.ConfigurationOptions(
                language = "de"
            ),
            context = this
        )
    }
}
API Reference
Functions
| Function | Parameters | Returns | Description |
|---|---|---|---|
initialize | authToken: StringclientId: Stringoptions: ConfigurationOptions?context: Context | Unit | Initializes the SDK by passing the auth data and language code |
registerEventListener | listener: AppnomixEventListener | Unit | Registers a listener for the onboarding lifecycle events |
trackOfferDisplay | context: String - A string identifying the screen or situation where the offer is displayed | Unit | Should be invoked, with a string context (e.g. "home_screen"), to aid in user funnel tracking |
showOnboarding | activity: ActivityjsonString: String? (optional) | Unit | Launches the SDK onboarding flow, required for enabling the Android Accessibility Service |
isAccessibilityServiceEnabled | None | Boolean | Checks whether the Android Accessibility Service permission is granted for the app |
isOnboardingAvailable | None | Boolean | Checks whether the onboarding flow for the Appnomix SDK is currently available |
goToAccessibilitySettings | activity: Activity | Unit | Takes the user to the OS Accessibility Settings directly |
Events
| Event | Description |
|---|---|
AppnomixEvent.ONBOARDING_STARTED | Triggered when the onboarding screen is shown |
AppnomixEvent.ONBOARDING_ABANDONED | Triggered if onboarding is exited early |
AppnomixEvent.ONBOARDING_FINISHED | Triggered when onboarding completes and extension is activated |
Testing & Support
Attribution Testing
To verify that your SDK integration and attribution tracking work correctly, contact [email protected]. The team can confirm that:
- Events are being tracked correctly
- User attribution is working as expected
- The integration is configured properly
What's Next
After a successful integration with Accessibility Permission granted, users visiting supported websites in Chrome will see:
- Automatic coupon detection and application
- Product price comparison (v2.0+)
- Product availability tracking (v2.0+)
- Deal notifications
Troubleshooting
Common Issues
If you encounter issues during integration, check the following:
-
Accessibility Service not enabled
- Verify that the user has completed the onboarding flow
- Use
AppnomixCSDK.isAccessibilityServiceEnabledto check the permission status - Use
AppnomixCSDK.goToAccessibilitySettings(activity)to direct users to the settings
-
Onboarding not showing
- Verify
AppnomixCSDK.isOnboardingAvailable()returnstrue - Check that your
clientIdandauthTokenare correct - Ensure
AppnomixCSDK.initialize()is called in your Application'sonCreate()before attempting to show onboarding
- Verify
-
Events not tracking
- Verify that
trackOfferDisplayis being called with a valid context string - Check that the SDK has been initialized before calling tracking functions
- Contact [email protected] to verify server-side tracking
- Verify that
-
Play Console submission issues
- Ensure you have completed the Accessibility Service declaration in Play Console (see Privacy & Permissions)
- Verify that your app's use case for Accessibility Service is properly documented
Error Codes
The SDK logs error codes to help diagnose integration issues. All errors are logged to the console, and critical errors are reported to Appnomix servers to help diagnose integration issues.
SDK Initialization Errors (E101-E105)
These errors occur when the SDK fails to initialize properly.
| Error Code | Message | Solution |
|---|---|---|
E101 | SDK init failed: missing clientId or authToken | Ensure both clientId and authToken are provided to initialize() |
E102 | SDK init: Config request timed out | Check your network connection; the SDK will retry automatically |
E103 | Config received but API usage is blocked remotely | Contact [email protected] - your account may be need to be setup |
E104 | SDK init: Received malformed config | Contact [email protected] with error details |
E105 | SDK init: Cannot schedule async jobs | Check that your app has proper background execution permissions |
Onboarding Errors (E201-E205)
These errors occur during the onboarding flow when users are setting up the Accessibility Service.
| Error Code | Message | Solution |
|---|---|---|
E201 | Onboarding failed to open: missing clientId/authToken | Ensure initialize() was called before showOnboarding() |
E202 | Onboarding failed to open: extension already enabled | The Accessibility Service is already enabled - no action needed |
E203 | Onboarding opened again: already completed | User has already completed onboarding - consider checking isOnboardingAvailable() first |
E204 | Onboarding failed to open: SDK config not received | Wait for SDK initialization to complete before showing onboarding |
E205 | Onboarding failed to open: SDK API disabled remotely | Contact [email protected] - your account may be need to be setup |
Network & Data Errors (E400-E404)
These errors occur during network requests or data processing.
| Error Code | Message | Solution |
|---|---|---|
E400 | Data: Bad request | Check SDK version compatibility; contact [email protected] if issue persists |
E401 | Network: Request timeout | Check network connectivity; the SDK will retry automatically |
E402 | Data: Deserialization error | Contact [email protected] - possible API change |
E403 | Data: Max retry reached | Network issue preventing data sync; will retry on next app launch |
E404 | Validation: validation failed | Contact [email protected] with the full error message including validation details |
Note: For any errors not listed here or if you need additional assistance, please contact [email protected] with the error code and relevant details from your logs.
Privacy & Permissions
Play Console Accessibility Service Declaration
Before submitting your app to the Play Store, you must complete the Accessibility Service declaration in the Play Console. This is required for all apps using android.permission.BIND_ACCESSIBILITY_SERVICE.
Steps to declare Accessibility Service usage:
- Log in to your Play Console
- Select your app
- Navigate to Policy > App content
- Find Accessibility and click Start
- Declare that your app uses Accessibility Services
- Provide the following information:
- Purpose: Select "Automated actions" or "Enhance user experience"
- Description: "This app uses Accessibility Services to detect active web pages in Chrome browser and automatically apply available discount codes and compare product prices, enhancing the shopping experience for users."
- Save and submit
For detailed guidance, refer to Google's official documentation: Accessibility Service declaration in Play Console
Required Permissions
The SDK automatically declares the following permission in its manifest:
<uses-permission android:name="android.permission.BIND_ACCESSIBILITY_SERVICE" />No additional permissions need to be declared in your app's manifest.